本文 Discord.js 版本 v14.7.1
Chapter 15 - 交互四大组件之:上下文菜单 Context Menu
上下文菜单(Context Menu),又称为 App Command。使用它,不需要用户显式的输入斜杠 / ,但是后台逻辑方面,和斜杠命令的函数方法基本一致。
上下文菜单交互(ContextMenuInteraction),分为 “用户上下文菜单交互”(UserContextMenuInteraction)和 “消息上下文菜单交互”(MessageContextMenuInteraction)。二者的使用方式不一样。
用户端使用 ContextMenu 的方法
对于 UserContextMenu
-
Android 和 iOS APP 端:点击某个(已注册部署上下文菜单的)机器人的头像,打开机器人个人资料。划到下面,找到菜单栏
BOT - APP,点开它,就能显示出这个机器人所有的 UserContextMenu。注意是只是 UserContextMenu,不包括该机器人的 MessageContextMenu。 -
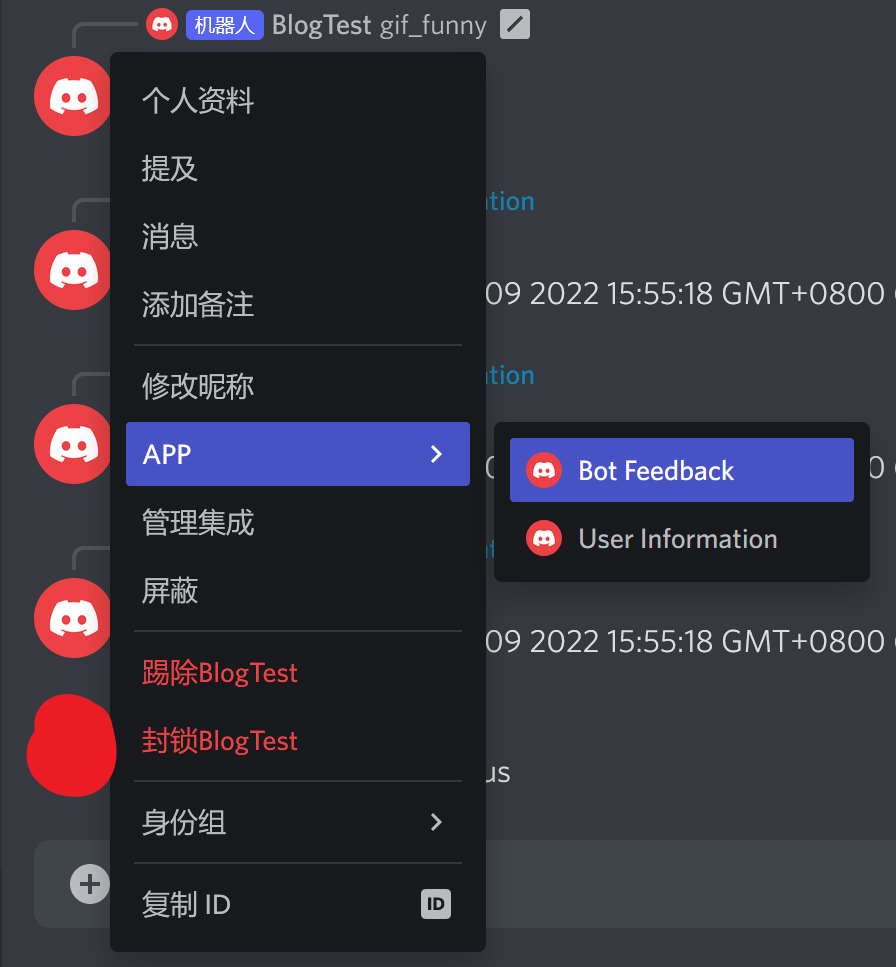
PC 端和浏览器端:点开机器人的个人资料是找不到入口的。鼠标右击机器人头像,在
APP选项卡里,存放了该机器人的所有 UserContextMenu。
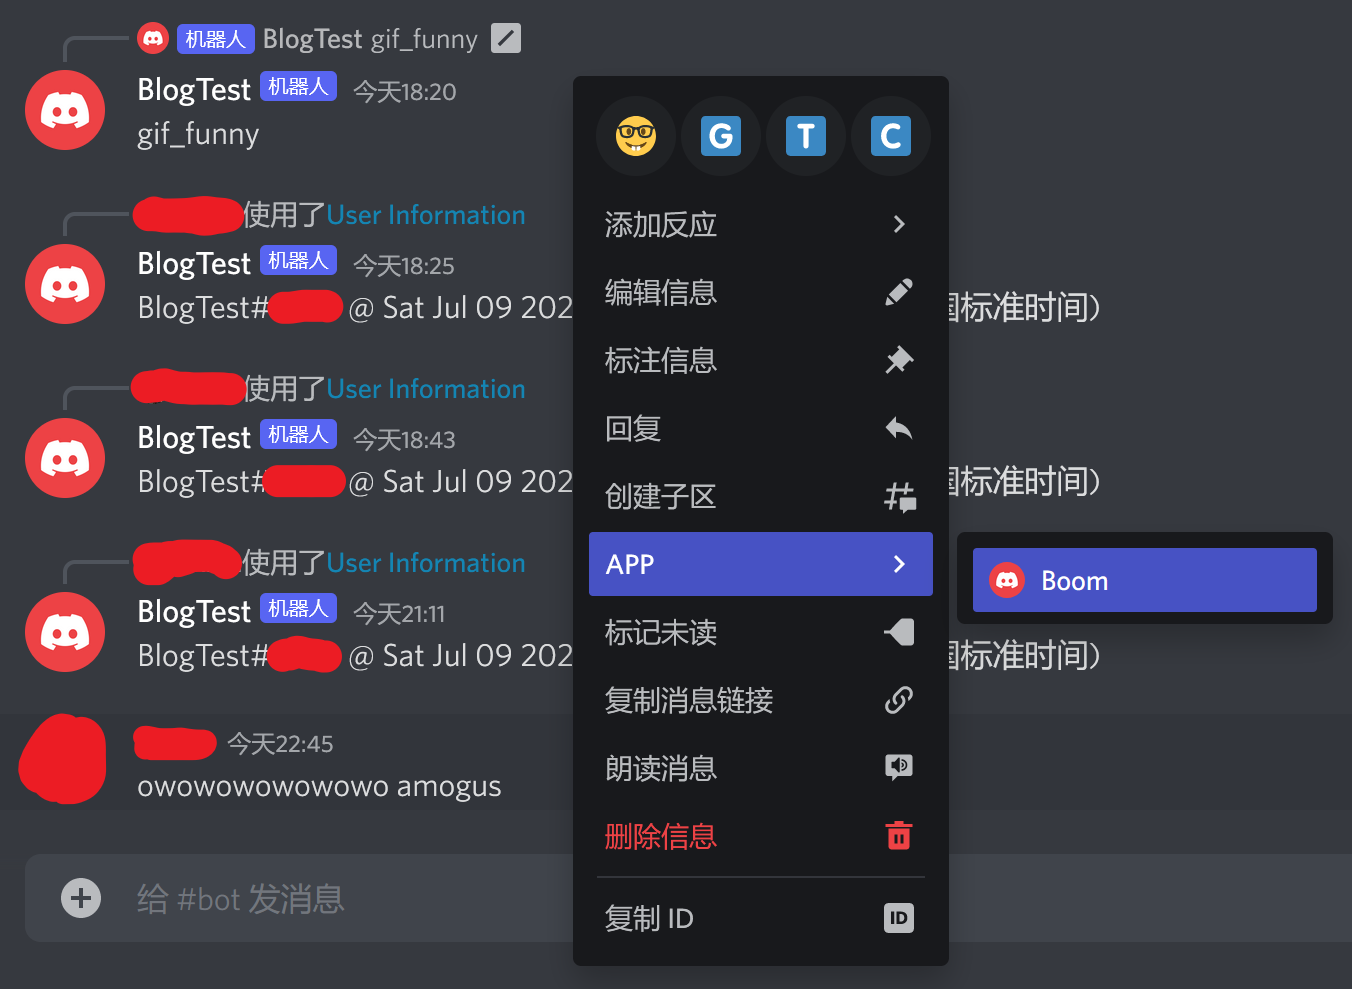
对于 MessageContextMenu
-
Android 和 iOS APP 端:长按频道内某条消息,呼出消息选项浮页。在
APP选项卡内,有着所有拥有该频道访问权的所有机器人的 MessageContextMenu。 -
PC 端和浏览器端:鼠标右击频道里的一条消息,在
APP选项卡里,有着所有拥有该频道访问权的所有机器人的 MessageContextMenu。
修改 events/interactionCreate.js
这次我们要修改的变多了,为了方便,你可以来我的 Github 代码仓库查看详细变动:
https://github.com/wtflmao/discord_bot_example/commit/945aa14a72637436a73c974775dfb0411b7a4ec7
- 不要删除
isChatInputCommand()分支的一行代码:await command.execute(interaction);。(commmit 里我误删除了,我的锅) - 不要删除
isAutocomplete()分支的一行代码:await command.execute(interaction);。(commmit 里我误删除了,我的锅) - 在最后一个 else 分支前,添加一个 else if 分支:
	else if (interaction.isContextMenuCommand()) {
		if (interaction.isUserContextMenuCommand()) {
			console.log("an APP command(user)!");
		} else if (interaction.isMessageContextMenuCommand()) {
			console.log("an APP command(message)!");
		} else {
			// not an APP command
		}
		const command = interaction.client.commands.get(interaction.commandName);
		await command.execute(interaction);
	}
新建一个 ContextMenu
const { ContextMenuCommandBuilder, ApplicationCommandType } = require('discord.js');

module.exports = {
    data: new ContextMenuCommandBuilder()
	    // 设置外显名称
        .setName('Boom')
        // 设置上下文菜单的类型
        // ContextMenuCommandsBuilder.setType 有两种有效枚举值:
        // ApplicationCommandType.Message 和 ApplicationCommandType.User
        .setType(ApplicationCommandType.Message),
};
举例:一个重复消息内容的 MessageContextMenu
commands/contextMenus/contextBoom.js:
const { ContextMenuCommandBuilder, ApplicationCommandType } = require('discord.js');

module.exports = {
    data: new ContextMenuCommandBuilder()
	    // 设置外显名称
        .setName('Boom')
        // 设置上下文菜单的类型
        // ContextMenuCommandsBuilder.setType 有两种有效枚举值:
        // ApplicationCommandType.Message 和 ApplicationCommandType.User
        .setType(ApplicationCommandType.Message),
    async execute(interaction) {
        // 这里 interaction 的类型是 ContextMenuInteraction,同时,也是 UserContextMenuInteraction
        // UserContextMenuInteraction 有一个属性叫 ".targetId", 它是此交互目标的 Discord snowflake id,这里(Message菜单)的话,指的是 Message 的 id
        // 我们用 interaction.channel.messages.fetch(interaction.targetId)) 来凭借消息 id 来获取消息本体
        // 然后通过抓取来的消息本体,获取消息的内容(content),存到 targetMsgContent
        const targetMsgContent = (await interaction.channel.messages.fetch(interaction.targetId)).content;
        await interaction.reply(`Boom! ${targetMsgContent}`);
    },
};
对消息 "owowowowowowo amogus" 使用 Boom:

举例:一个显示指定用户注册时间的 UserContextMenu
commands/contextMenus/conetxtUserInfo.js:
const { ContextMenuCommandBuilder, ApplicationCommandType } = require('discord.js');
// DISCORD_EPOCH 是个常数, 指的是 2015 年的第一毫秒,是以毫秒为单位的 UNIX 时间戳
const DISCORD_EPOCH = 1420070400000;

module.exports = {
    data: new ContextMenuCommandBuilder()
	    // 设置外显名称
        .setName('User Information')
        // 设置上下文菜单的类型
        // ContextMenuCommandsBuilder.setType 有两种有效枚举值:
        // ApplicationCommandType.Message 和 ApplicationCommandType.User
        .setType(ApplicationCommandType.User),
    async execute(interaction) {
        // Discord snowflake 类型值是一个 64 位的整数。在实践中,我们用字符串来存储。
        // 我们把 snowflake 类型的 interaction.targetId 强制类型转换成 JS 内置的 BigInt 类型
        // Discord snowflake 的高 42 位叫 “相对时间戳”
        // “相对” 指的是自 DISCORD_EPOCH 以来,过去了多少毫秒了
        // 64 位中,剩余的低 22 位和我们的时间戳无关,丢弃就好
        const milliseconds = BigInt(interaction.targetId) >> BigInt(22);
        // 把 DISCORD EPOCH 和 “相对时间戳” 相加,就得到真正的 UNIX 时间戳,以毫秒为单位
        // 再把这个时间戳转换成本地时区的人类可读的时间字符串
        let date = new Date(Number(milliseconds) + DISCORD_EPOCH)
        await interaction.reply(`${interaction.targetUser.username}#${interaction.targetUser.discriminator} @ ${date}`);
    },
};
我们对机器人自己使用 UserInfo 效果图:

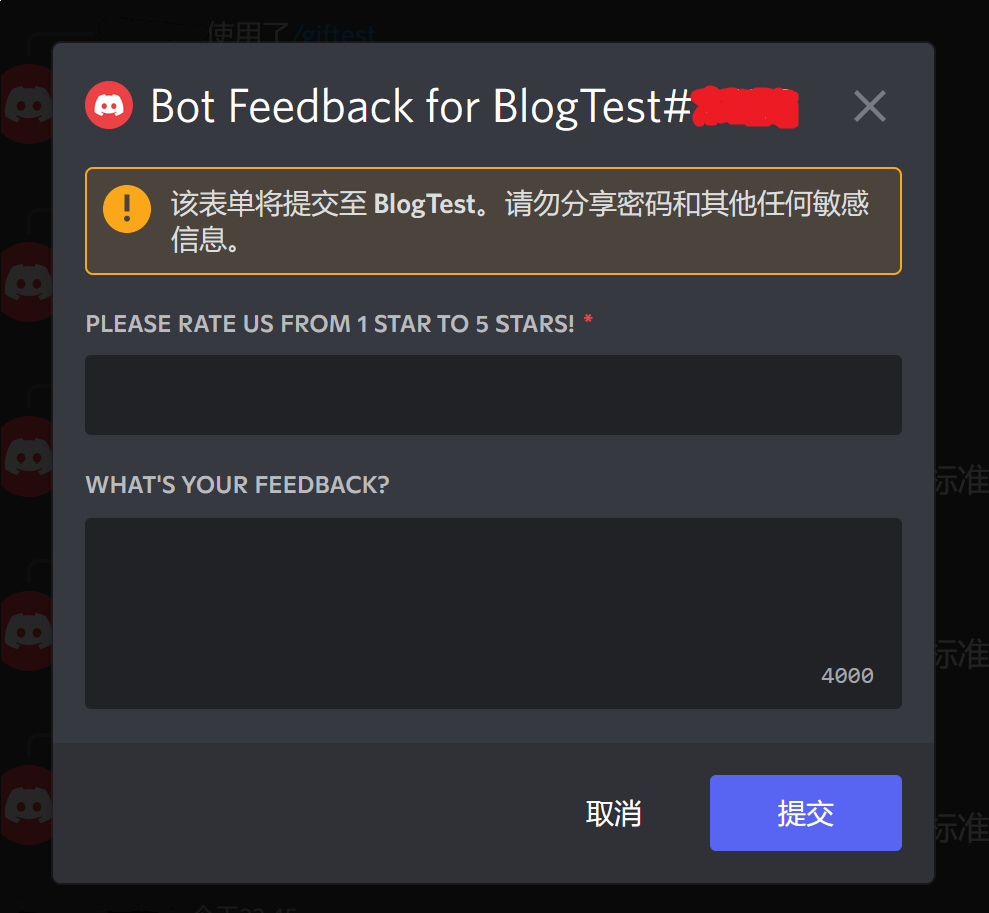
例子:把 Modal 和 ContextMenu 柔到一起:反馈功能
下面的代码就是上面两段程序的糅合,注释解释的很清晰,故看代码注释就行。
commands/contextMenus/contextFeedback.js:
const { ContextMenuCommandBuilder, ApplicationCommandType, ModalBuilder, TextInputBuilder, TextInputStyle, ActionRowBuilder } = require('discord.js');

module.exports = {
    data: new ContextMenuCommandBuilder()
        .setName('Bot Feedback')
        // There are two available options for the .type of ContextMenuCommandsBuilder
        // ApplicationCommandType.Message and ApplicationCommandType.User
        .setType(ApplicationCommandType.User),
    async execute(interaction) {

        // We use interaction.client.users.cache.find() to get a User by its id
        const botInstance = interaction.client.users.cache.find(user => user.id === interaction.applicationId);

        // Create a new Modal
        const modal = new ModalBuilder()
            .setCustomId('feedbackModal')
            // username#discriminator be like: Elon#0001
            .setTitle(`Bot Feedback for ${botInstance.username}#${botInstance.discriminator}`);

        // Add components to modal...
        // Create the text input components
        const starsInput = new TextInputBuilder()
            .setCustomId('starsInput')
            // The label is the prompt the user sees for this input
            .setLabel("Please rate us from 1 star to 5 stars!")
            // Short means only a single line of text
            // TextInputStyle only have two members: .Short and .Paragraph
            .setStyle(TextInputStyle.Short)
            // Set required
            .setRequired(true)
            .setMinLength(1)
            .setMaxLength(1);

        const feedbackInput = new TextInputBuilder()
            .setCustomId('feedbackInput')
            .setLabel("What's your feedback?")
            // Paragraph means multiple lines of text.
            .setStyle(TextInputStyle.Paragraph)
            // Set required
            .setRequired(false);

        // An action row only holds one text input,
        // so you need one action row per text input.
        const firstActionRow = new ActionRowBuilder().addComponents(starsInput);
        const secondActionRow = new ActionRowBuilder().addComponents(feedbackInput);

        // Add inputs to the modal
        modal.addComponents(firstActionRow, secondActionRow);

        // Show the modal to the user
        // Showing a modal must be the first response to an interaction.
        // You cannot defer() or deferUpdate() then show a modal later.
        await interaction.showModal(modal);


        // Get the ModalSubmitInteraction that is emitted once the User submits the Modal
        const submitted = await interaction.awaitModalSubmit({
            // Timeout after a minute of not receiving any valid Modals
            time: 600 * 1000,
            // Make sure we only accept Modals from the User who sent the original Interaction we're responding to
            filter: i => {
                if (i.user.id === interaction.user.id && i.customId === 'feedbackModal') {
                    return true;
                }},
        }).catch(error => {
            // Catch any Errors that are thrown (e.g. if the awaitModalSubmit times out)
            console.error(error)
            return null
        })

        // If we got our Modal, we can do whatever we want with it down here.
        // Remember that the Modal can have multiple Action Rows, but each Action Row can have only one TextInputComponent.
        // You can use the ModalSubmitInteraction.fields helper property to get the value of an input field from its Custom ID.
        if (submitted) {
            // Get the data entered by the user
            const stars = submitted.fields.getTextInputValue('starsInput');
            const feedback = submitted.fields.getTextInputValue('feedbackInput');
            // We use console.log() to display the feedbacks
            console.log(`FeedBack {@${interaction.user.id}, ${stars}, ${feedback}}`);
            // Acknowledge the user that the feedback submitted successfully
            await submitted.reply({
                content: `We've  got your feedback. Thanks for your time and honesty.`,
                // We don't want other people see somebody sent a feedback, so set ephemeral field to true
                ephemeral: true
            })
        }
    },
};
图: